UPDATE NOVEMBER 2015:
The root process has changed for the Nexus Player now that the device is running Android 6.0 Marhsmallow. I've updated this article with detailed instructions on the new root process, but the video below still depicts the old process for Android Lollipop.
If you'd like, you can use the video for reference, since it's still helpful for a few aspects of the Marshmallow root process. But when it actually comes time to root, I'd suggest that you only follow the steps outlined in this article.
END UPDATE
At its core, the Nexus Player is truly an Android device. This means that pretty much anything your smartphone can do, Google's new set-top box can do just as well.
Getting root access is no exception to this rule. Legendary Android developer Chainfire has already devised a quick and painless method that will grant you Superuser privileges on the Nexus Player in no time, and I'll outline the process below.
What You'll Need for This Method
- Nexus Player running Android 6.0 Marshmallow
- Windows PC
- Micro USB data cable
- Mouse connected to Nexus Player
Step 1: Put Your Nexus Player into Bootloader Mode
To begin, unplug the power cable from your Nexus Player and flip the device over. Wait a few seconds for any capacitors to clear their charge, then press and hold the Bluetooth pairing button on the bottom of the device.
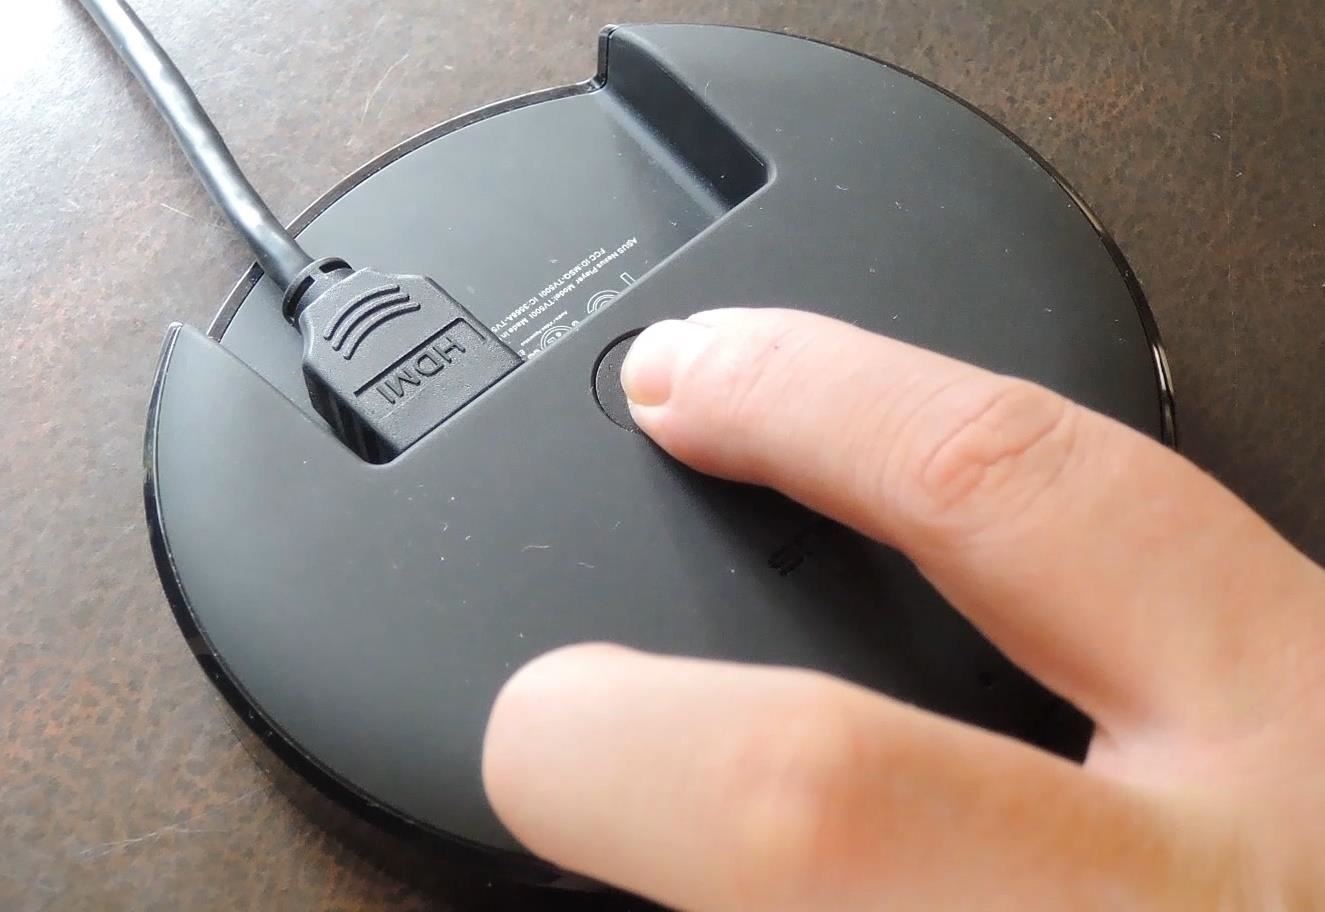
While still holding down the Bluetooth button, plug the power cable back into your Nexus Player. Watch the LED light on the bottom of the device—when it starts blinking, you can let go of the Bluetooth pairing button.

Shortly after that, you'll see Android's bootloader menu coming up on your display. The menu looks like this:

Next, just connect your Nexus Player to your PC with a micro USB data cable.

Step 2: Download the Necessary Files
On your PC now, there are a few files that you'll need to download. First, since we'll be rooting the device with Fastboot commands, you'll need ADB and Fastboot drivers. You can download the installer file at this link—simply run the file and follow the prompts, then the Fastboot drivers will be installed on your system.
Next, you'll need an ADB and Fastboot package to actually run the commands. Download "Minimal ADB and Fastboot" at this link, then run the file to install the program. When installation is finished, you'll see a command prompt window. Leave this window open for later.

Then there are 3 files you'll need for actually rooting your Nexus Player. First up is a modified boot image, which can be downloaded at this link.
Secondly, you'll need Chainfire's SuperSU ZIP, which can be found here.
Finally, you'll need a copy of TWRP recovery for the Nexus Player, which you'll be using to install the SuperSU ZIP. That file can be found here.

Step 3: Move the Root Files to the Right Locations
Next, there's a tiny bit of maintenance you'll have to do. Start by copying the twrp.img and boot.img files over to the Minimal ADB & Fastboot program folder on your computer. This location can vary depending on your Windows version, but for most users, it can be found at C:\Program Files (x86)\Minimal ADB and Fastboot.

From here, you'll need to transfer the BETA-SuperSU-v2.52.zip file over to your Nexus Player's internal storage. If you haven't already set up a method for transferring files to your Nexus Player, you can use steps 1 through 3 depicted here.
Step 4: Unlock the Bootloader
Next, you'll have to unlock the Bootloader on your Nexus Player if you haven't done so already. Be warned that this will wipe all of the data on your device, so you'll have to run through initial setup again and reinstall your apps, and you will lose any media that you have stored on your Player.
To begin, bring that Minimal ADB and Fastboot command prompt window back to the forefront.

Type fastboot devices into the command prompt to verify that your Nexus Player is connected properly, then hit the Enter key. If you see a hardware ID number, you're good to go.

Next, type fastboot oem unlock, then press Enter again. The first time you run this command, you'll see an error message, but this is to be expected. Simply type the same command a second time, and your Nexus Player's bootloader will be unlocked.

After that, type fastboot reboot-bootloader, then hit Enter again.

Step 5: Install TWRP & the Modified Boot Image
With the same command prompt window open, type fastboot flash boot boot.img and hit enter to install the modified boot image.

When that process has finished, type fastboot flash recovery twrp.img and hit enter to install TWRP recovery on your Nexus Player.

At this point, you're done with the command prompt, so you can disconnect the USB cable from your Nexus Player if you'd like.
Step 6: Boot Your Nexus Player into TWRP
From here, you're just about ready to root your device. With your Nexus Player still in Bootloader mode, press the Bluetooth pairing button on the bottom of the device one time to highlight the "Recovery Mode" option.

From here, press and hold the pairing button for 3 seconds, then release it. At this point, your Nexus Player should boot into TWRP recovery.

Step 7: Root the Device
All that's left to do now is to root your Nexus Player. From TWRP's main menu, use your mouse to click the "Install" button, then browse for and select the BETA-SuperSU-v2.52.zip file.

From here, use your mouse to swipe the slider at the bottom of your screen, which will install SuperSU and root your Nexus Player.

When the process has finished, click the "Reboot System" button and you should be rooted when you get back up.

Now that you're rooted, are there any particular mods that you'd like to see covered for the Nexus Player? Tell us about it in the comment section below, or drop us a line on Facebook, Google+, or Twitter.
Just updated your iPhone? You'll find new features for Podcasts, News, Books, and TV, as well as important security improvements and fresh wallpapers. Find out what's new and changed on your iPhone with the iOS 17.5 update.











9 Comments
thanks for the guide! I'm interested in how to remove the rsa authorization requirement to use adb over tcp/ip or adb over wifi as most people call it. I'm trying to controll the nexus over the network from a device that can't do the rsa math.
It seems this method is outdated and no longer works. My attempt failed at the command "fastboot boot root.img" Where it rebooted and just got stuck on the spinning wheels and bouncing balls screen.
With Android 6.0, the new root methods require that you install a modified boot image or kernel first. I'll have to update this article to reflect the new process, but it basically goes like this:
Dallas--
I followed these instructions on two new nexus Players and all appears to have gone well. BUT! When I do the final Reboot, All I get is the "Google" Screen with the "Unlocked" icon at the bottom of it.
It is replicating on both Player devices. Any Advise on how to get them functional?
Ho did you fix the spinning wheels and bouncing balls screen?
Found a way to root with no keyboard using adb/adb shell.
After step 12
Hey Can you update the whole root process for Marshmallow Build MRA58N...twrp and super su i could get ..but could you please tell which boot image to flash
Thanks for telling us in the instructions that we had to have a mouse. I got all the way to that part and don't have a mouse... so now what. I have a brick, until a buy a micro usb/female use converter and a mouse.
Maybe you should put a big warning up top that says this stuff is required. I have no way to hook up my mouse now and my nexus player is a nice paper weight.
entitled much? your inability to read instructions shouldn't be anyone 's problem but your own.
Share Your Thoughts